
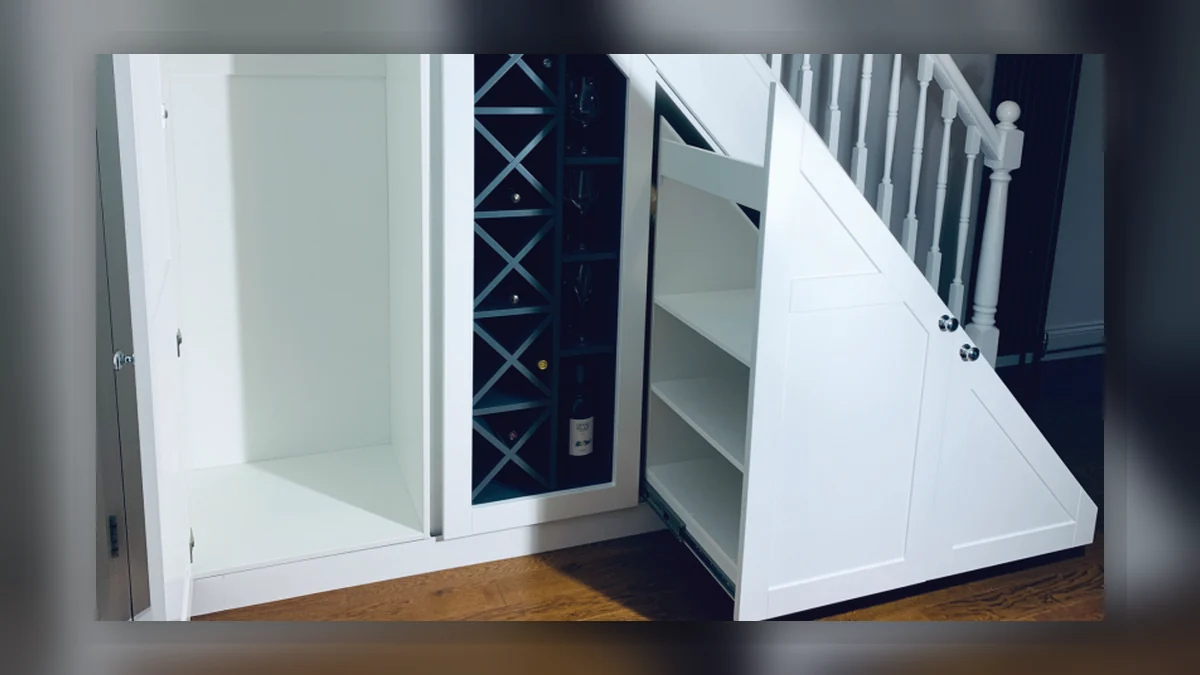
Häfele has put research behind something most joiners already suspected: homeowners are increasingly spending on making existing space work harder rather than extending. Understairs space is one of the clearest examples — a volume that exists in nearly every UK two-storey home and which, in the overwhelming majority of them, holds a hoover and a tangle of coats.
Source: Professional Builder
For a builder or joiner, it is one of the better-value jobs going: a self-contained project, no structural work in most cases, no party wall issues, minimal disruption, and a visible result that sells the next job. This guide covers how to actually build one.
---
Start with the geometry, because it decides everything
An understairs void is a right-angled triangle in elevation, and the awkward truth is that the tall end is useful and the shallow end mostly is not.
For a typical UK domestic staircase:
- Rise per step: 190-220mm (Part K caps domestic rise at 220mm)
- Going per step: 220-250mm minimum
- Pitch: commonly 38-42 degrees, with 42 degrees the Part K maximum for a private stair
- Total run: usually 2.6-3.2m for a 13-step flight
That gives you, from the newel post end, roughly 2m of full standing height falling away to nothing. Divide the run into thirds and the practical picture is:
Zone 1 — the deep end (first third, roughly 1.3m+ head height). Full-height storage. Coats, a slim WC if drainage allows, a home office nook, a dog crate, a boot room bench.
Zone 2 — the middle (roughly 0.6-1.3m). The sweet spot for pull-out drawers. Deep enough to be genuinely useful, shallow enough that fixed shelving would be unreachable.
Zone 3 — the shallow end (under 600mm). Shoe storage, low pull-outs, or — often the right answer — leave it sealed and plastered rather than build joinery nobody can reach.
The single most common mistake on a DIY-built understairs unit is treating the whole void as one cupboard with one door. The back of it is then unreachable and becomes exactly the dumping ground it replaced.
---
The three layouts that actually work
1. Side-access pull-outs (the best use of the space)
Full-depth drawer units that pull out into the hallway, running perpendicular to the stair. Each unit is cut to the stair rake, so the whole triangle gets used and everything is reachable from the front.
Why it works: nothing is buried. You get access to the back of the void without crawling into it.
Hardware that matters: these units are heavy — a loaded pull-out can easily hit 60-80kg with the carcass. Use full-extension ball-bearing runners rated at minimum 45kg per pair, and for the deep units step up to 70kg heavy-duty runners. Soft-close is worth specifying: a heavy pull-out slammed repeatedly will work its fixings loose within a year.
Watch the floor. These units sit on and roll across the hall floor covering. If it is carpet, the drawer base needs castors or a rail rather than runners alone, or you will be dragging carcass across pile.
2. Door-fronted cupboards to the stair line
A run of two or three hinged or push-to-open doors following the rake, with fixed shelving behind each.
Why it works: cheapest option, quickest to build, and the doors can be painted to disappear into the wall or trimmed to read as panelling.
Hardware that matters: doors cut to a rake are heavier at one edge than the other, which puts uneven load on the hinges. Use three hinges on anything over 900mm tall rather than two, and specify a hinge with a wider adjustment range so you can correct the inevitable drop.
Push-to-open vs handles: push-to-open latches give the clean handleless look that sells the job, but they need consistent door gaps. On a rake-cut door in an old house with an out-of-square stair, handles are more forgiving.
3. Open shelving and a bench
No doors. Cubbies, a seat over a shoe drawer, hooks above.
Why it works: converts the space into a functional boot room, which is often what a family actually needs. Cheapest of all and reads as a designed feature rather than a cupboard.
Downside: it is on permanent display, so it only works if the household will keep it tidy. Worth saying out loud to the client before you build it.
---
Building regs: the bit people get wrong
Protected stairways. In a two-storey house where the stair forms the only escape route, the space under a protected stairway is regulated. Approved Document B is specific: the enclosure under such a stair must be either fire-resisting (typically 30 minutes) or the space must not be used for storage at all beyond a cupboard that is itself fire-separated.
In practice, for a standard two-storey house with the stair discharging to a final exit, the usual approach is to line the understairs enclosure with 12.5mm fire-rated plasterboard on the stair side and fit an FD30 door if it is a cupboard. In a three-storey house, where the stair is a properly protected escape route, this is not optional.
If you are adding a WC. Part M applies to a new WC in an existing dwelling in some circumstances, and Part H applies to the drainage. The practical constraint is usually headroom over the pan — you want a minimum of around 1.9m of standing height at the front of the pan, which pushes it firmly into Zone 1.
Electrics. Sockets and lighting inside the enclosure are notifiable work under Part P if you are not registered. Plan the first fix before the carcass goes in; retro-fitting a socket into a finished understairs unit is miserable.
Building regulations guidance here is general — confirm the specific requirement with building control on any job where the stair is the sole means of escape.
---
Materials and a rough build sequence
Carcass: 18mm MRMDF or birch ply. MRMDF takes paint beautifully and is cheaper; birch ply is stiffer, lighter and better if the units are pull-outs carrying weight. Avoid standard MDF in a hallway that gets wet coats hung in it.
Fronts: 18mm MRMDF for a painted finish, or veneered ply if you are going for a natural finish. Get fronts machined and sprayed off site if the budget runs to it — hand-painted MDF edges in a hallway never look as good.
Sequence:
1. Strip out, and establish whether the stair strings are structural and whether anything is fixed to them. 2. Scribe a template of the rake. The underside of a stair is rarely straight or square — take the profile off the actual stair, not off a drawing. 3. First fix electrics and any plumbing. 4. Line and fire-rate the enclosure if required. 5. Build and fit the base frame, level it to the floor rather than to the stair. 6. Install carcasses, then runners, then drawers, then fronts. 7. Scribe the fronts last, once everything is in and settled.
Tools it is worth having on this job specifically: a track saw (for cutting sheet fronts cleanly on site), a jigsaw or multi-tool for the rake scribing, a long spirit level or laser for establishing the base plane, and a decent digital angle finder — stair rakes are almost never the number on the drawing.
---
What to charge for
The commercial appeal of this job is that it is priced as joinery rather than as a builder's day rate, and the material cost is genuinely low relative to the perceived value. A typical run of three side-access pull-outs is a few hundred pounds of sheet material and hardware and several days of skilled work.
Häfele's research angle — homeowners investing in making existing space work rather than extending — is the sales pitch to lead with. Source: Professional Builder
---